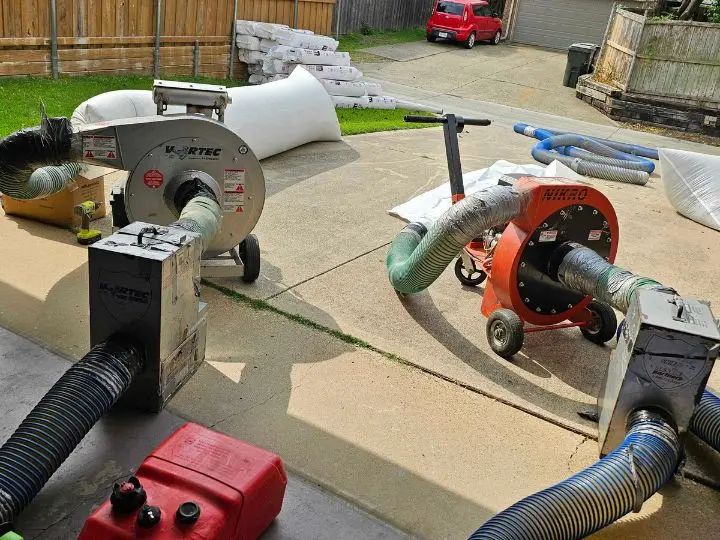
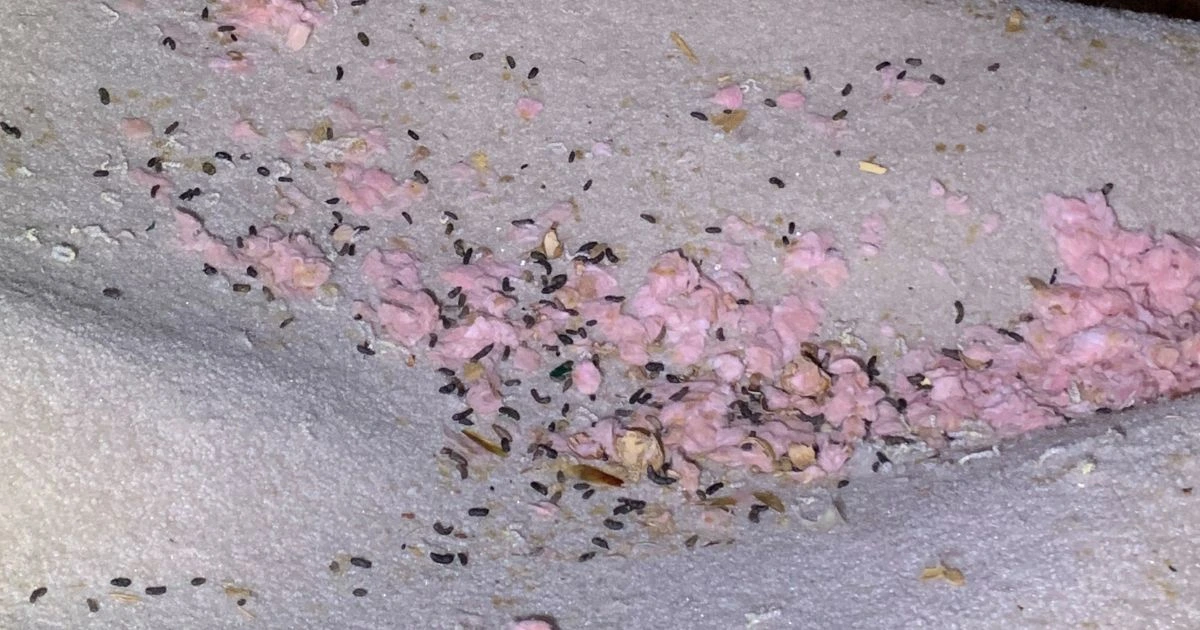
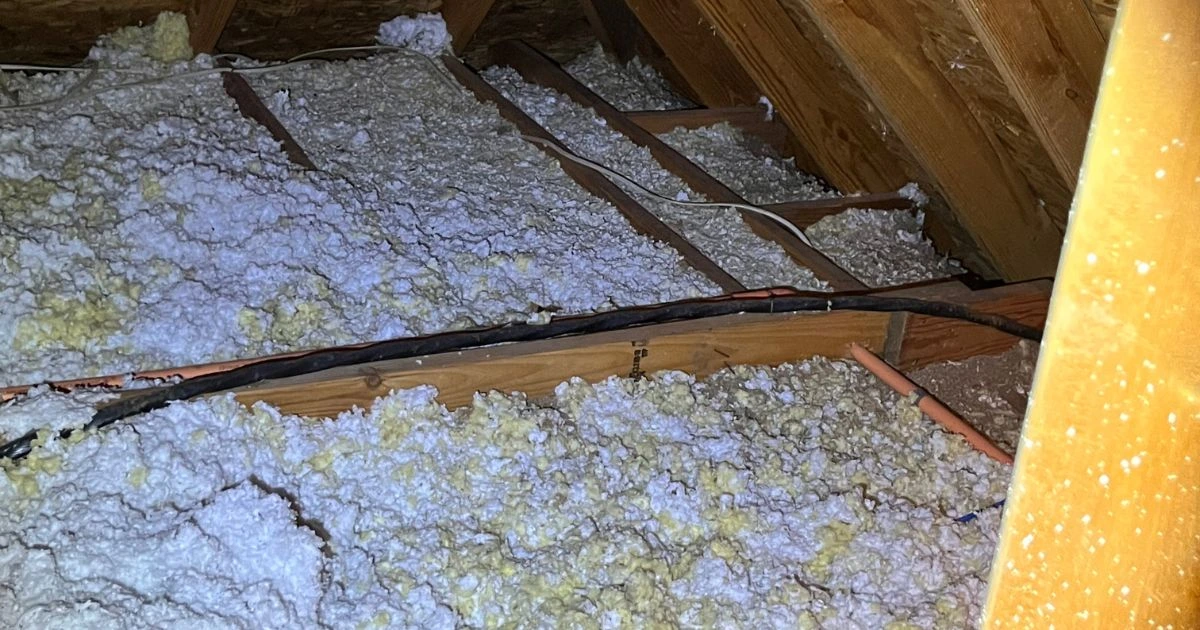
tiktok
Critter Stop Logo
Critter Stop Logo
tiktok
Critter Stop Logo
Home » Blog » Uncategorized » How to Remove Insulation: A Step-by-Step Guide for Homeowners

How to Remove Insulation: A Step-by-Step Guide for Homeowners

how to remove insulation

Removing insulation can be daunting, but it doesn't have to be. The right tools and methods are the key to removing insulation safely and efficiently. Understanding the specific type of insulation being removed is essential, as it dictates the approach and precautions necessary for the job.

Homeowners often encounter insulation removal during renovations or repairs, and knowing how to navigate this process is crucial. Maintaining safety by wearing proper gear, such as gloves, masks, and goggles, is vital to protect against harmful particles. It’s also important to ensure good ventilation to minimize exposure to dust and other irritants.

Additionally, familiarizing oneself with different insulation types—such as fiberglass, foam board, or cellulose—can make the removal process more manageable. Each type may require specific techniques for removal, so comprehensive preparation will lead to better results. Knowledge of the right steps makes the process smoother and more effective for anyone tackling this project.

Types of Insulation and Preparation

how to remove insulation

Identifying the insulation type in a building and preparing for removal is crucial to ensure safety and efficiency. Different insulation materials have distinct characteristics that influence the removal process.

Identification of Insulation Types

Insulation comes in various materials, each with its properties and removal techniques. Common types include:

  • Fiberglass Batts: Pink or yellow, with a fluffy texture. It is found in walls and attics and requires careful handling to avoid skin irritation.
  • Foam Board: Rigid panels that provide high insulation value. They may need cutting tools for removal.
  • Spray Foam Insulation: This expands upon application. It can be tricky to remove due to its adhesion.
  • Cellulose Insulation: Made from recycled paper products, it is often loose-fill. Removal involves vacuuming or scooping.

Proper identification guides the choice of tools and methods for effective removal.

Preparation for Removal

Preparation is key before starting the insulation removal process. Essential steps include:

  1. Safety Gear: Wear gloves, goggles, and masks to protect against respiratory irritants and skin contact.
  2. Tools Required:
    • Utility knife for cutting.
    • Respirator or mask for dust protection.
    • Vacuum specifically designed for insulation to minimize dust and debris.
  3. Containment: Sealing the workspace limits the spread of dust and potential allergens.

Planning ensures a smoother removal process while maintaining safety and cleanliness. Proper identification and preparation set the foundation for effective insulation removal.

Safety Measures and Equipment

Safety is paramount when removing insulation. Proper equipment and protective gear help prevent injuries and exposure to harmful materials.

Personal Protective Equipment

The right personal protective equipment (PPE) is essential during insulation removal. This equipment safeguards the individual and minimizes exposure to potentially hazardous substances.

  • Respirator: A mask with a proper filter prevents inhalation of insulation fibers and dust.
  • Goggles: Protective eyewear shields the eyes from irritants and debris.
  • Gloves: Durable gloves protect the hands and ensure a secure tool grip.
  • Coveralls: Wearing disposable coveralls keeps contaminants off regular clothing and skin.

Before beginning work, it’s important to ensure all PPE is properly fitted and in good condition. Regular checks and proper storage of equipment can enhance safety.

Area Preparation

Preparing the work area is crucial for a safe insulation removal process. This step reduces the risk of accidents and ensures efficient workflow.

  1. Clear the Area: Remove any unnecessary items to create a safe workspace.
  2. Seal Off Areas: Use plastic sheeting to isolate the work area, preventing dust from spreading.
  3. Proper Ventilation: Ensure adequate airflow by opening windows or using fans.

Creating a designated area for debris disposal also helps maintain organization. All safety protocols should be followed to ensure a smooth and safe insulation removal process.

The Removal Process

how to get rid of insulation

With the right approach, removing insulation can be straightforward. Each type of insulation has its removal method, which requires specific tools and safety precautions.

Removing Loose-fill Insulation

Loose-fill insulation is typically made from materials like cellulose or fiberglass. To protect against inhalation and skin irritation, wear safety gear such as gloves, goggles, and a mask.

Using a vacuum with a specialized attachment can effectively remove loose-fill insulation. The homeowner should set up a containment area to prevent dust and debris from spreading. If a vacuum isn't available, a large plastic bag can gather the material by hand, ensuring minimal mess.

Work slowly to avoid damaging the surrounding structure. The removed insulation must be disposed of according to local regulations, as it may be considered hazardous waste.

Removing Batt and Roll Insulation

Batt and roll insulation consists of large, rigid sections, often made from fiberglass. To facilitate easy removal, a utility knife can cut the insulation into manageable pieces.

During this process, he or she should wear protective equipment such as gloves and a mask to limit exposure to fiberglass particles.

Once cut, carefully lift the sections out, starting from the top down and ensuring they do not tear. Place the insulation into heavy-duty plastic bags for disposal, sealing them to prevent any fibers from escaping.

If the batt insulation is older, it may be wise to have it tested for asbestos, especially in homes built before the 1980s.

Removing Spray Foam Insulation

Spray foam insulation requires a more specialized approach for removal. First, wear extensive protective gear, as this type of insulation can be particularly messy and hard to handle.

To start the process, use a utility knife or a specialized foam saw to cut through the foam. The worker should work slowly, ensuring to cut away from the housing materials to prevent damage.

After cutting, manually pull the foam away from the surfaces. Additional tools, like a pry bar, may help loosen stubborn sections.

Dispose of the removed foam following local disposal guidelines, as it may require special handling due to its composition.

Cleanup and Disposal of Old Insulation

how to remove insulation

Removing old insulation requires careful cleanup and proper disposal to ensure safety and environmental responsibility. This section addresses key practices for maintaining a safe work environment and guidelines for disposing of insulation materials.

Cleaning the Area

Cleaning the area after insulation removal is crucial for safety and hygiene. First, ensure the work site is free of debris and hazardous materials. Clean up any loose insulation particles using a vacuum equipped with a HEPA filter, which traps small particles that could be harmful.

Next, dampen a cloth with a mild detergent solution and wipe down surfaces that may have been contaminated. This step helps to remove any residual dust or fibers. Properly dispose of all cleaning materials afterward to avoid contamination.

Finally, wear protective gear throughout the cleanup. A mask, gloves, and goggles can prevent inhalation of dust and fibers. Ensure adequate ventilation in the space to reduce airborne particles during the cleanup process.

Disposal Guidelines

Knowing how to dispose of insulation is essential. Old insulation materials such as fiberglass, cellulose, or foam must be handled according to local regulations. Begin by checking local guidelines for hazardous waste disposal to determine if any materials are considered toxic.

Most non-hazardous materials can be thrown away with regular trash. However, it is advisable to contain insulation in sealed bags to prevent fibers from escaping. Label the bags clearly to inform sanitation workers of their contents.

For excessive amounts of specialized materials, contacting a waste disposal company that handles construction debris may be necessary. They can provide safe disposal options and ensure compliance with environmental standards.

Post-Removal Considerations

how to get rid of insulation

After removing insulation, it’s essential to assess the area for any issues needing attention. This includes checking for damage and planning for re-insulation or upgrades to ensure optimal energy efficiency and comfort.

Inspection and Repair

Once insulation is removed, inspecting the underlying structures is crucial. This includes checking for:

  • Water Damage: Look for any evidence of leaks, mold, or rot.
  • Structural Integrity: Ensure that beams and joists are sound.

Any damage needs to be repaired promptly. For instance, replacing damaged wood can prevent further complications. It is also beneficial to assess any potential pest infestations. Wildlife like rodents can create significant damage, and addressing this early is important. 

A professional pest control agency like Critter Stop can help identify and resolve these issues effectively. They have a fantastic reputation and online customer reviews because they provide high-quality work and great customer service. 

Don’t hesitate to contact Critter Stop at (214) 234-2616 for a free inspection.

Re-Insulation and Upgrades

After repairs, consider the benefits of re-insulating and potential upgrades. Choosing the right insulation can significantly affect energy efficiency. Here are several options to consider:

  • Fiberglass Batts: Common and cost-effective.
  • Spray Foam: Offers superior air sealing and insulation value.
  • Blown-in Insulation: Ideal for hard-to-reach areas.

When re-insulating, ensuring the R-value meets local building codes is important. This enhances energy efficiency and comfort levels. Upgrading to high-performance insulation products can yield long-term savings on energy bills.

Consider contacting Critter Stop for advice on any wildlife issues encountered during the insulation removal. Their expertise can help create a safer, more comfortable living space.

Frequently Asked Questions

Specific methods and precautions are essential for safety and efficiency when removing insulation. The following questions address common concerns related to the process.

What are the best methods for how to remove insulation from an attic safely?

To remove insulation from an attic safely, it is crucial to wear appropriate personal protective equipment (PPE), including gloves, a mask, and goggles. Using a vacuum specially designed for insulation removal can minimize dust and airborne particles while keeping the area clean. A utility knife can help cut the insulation into manageable pieces using hand tools.

How to get rid of insulation without causing damage to the surrounding structures?

Use the correct tools and methods to prevent damage to surrounding structures. A vacuum system can efficiently remove material for loose-fill insulation while avoiding contact with beams and ducts. Gently lifting batts out prevents tearing, ensuring the underlying surfaces remain intact.

Are there specific tools needed for how to safely remove insulation from walls?

Removal of wall insulation often requires specific tools. A stud finder can identify wall studs and minimize damage when cutting into walls. Additionally, a utility knife, a long-handled vacuum, and possibly a pry bar will help extract insulation effectively without harming the wall structure.

What steps should I take to safely remove insulation from crawl spaces?

Careful preparation is essential in crawl spaces. First, ensure adequate ventilation to minimize fiber inhalation. Using a respirator and gloves, workers should carefully remove insulation using a vacuum, if possible, or hand tools for batts while being mindful of sharp edges and potential contaminants.

How to remove insulation if it’s contaminated by pests or mold?

If insulation is contaminated by pests or mold, strict guidelines must be followed. The area should be sealed off to prevent the spread of spores or pests. Appropriate PPE must be worn, and contaminated insulation should be placed in sealed bags for disposal. Professional assistance may be advisable for severe cases.

What precautions should I take when learning how to get rid of insulation?

Before removing insulation, precautions should include conducting a safety assessment of the area and identifying any hazardous materials. Ensure that you wear suitable PPE and have appropriate tools at hand. It’s also advisable to familiarize yourself with local regulations regarding the disposal of insulation materials.

How to safely remove insulation without exposing yourself to hazardous materials?

It is essential to perform an inspection first to avoid exposure to hazardous materials during insulation removal. Identifying potential dangers, such as asbestos or lead paint, will help plan removal. A high-efficiency particulate air (HEPA) filter vacuum can help manage dust and particles, protecting workers' respiratory health.

Critter problem? We can put a stop to that!

Safe Wildlife Removal
Mosquito Control
Insulation Services
Dead Animal Removal
crossmenu